main
./nc.c, 处理daemon, pidfile, args, config, 最后:
nc_run(struct instance *nci)
{
ctx = core_start(nci);
for (;;) {
status = core_loop(ctx);
if (status != NC_OK) {
break;
}
}
core_stop(ctx);
}
Table of Contents
同样的一组后端, 可以配成两种:
redis1:
  listen: 0.0.0.0:9999
  redis: true
  hash: fnv1a_64
  distribution: ketama
  auto_eject_hosts: true
  timeout: 400
  server_retry_timeout: 2000
  server_failure_limit: 1
  servers:
   - 127.0.0.1:6379:1
   - 127.0.0.1:6380:1
   - 127.0.0.1:6381:1
   - 127.0.0.1:6382:1

redis2:
  listen: 0.0.0.0:10000
  redis: true
  hash: fnv1a_64
  distribution: ketama
  auto_eject_hosts: false
  timeout: 400
  servers:
   - 127.0.0.1:6379:1
   - 127.0.0.1:6380:1
   - 127.0.0.1:6381:1
   - 127.0.0.1:6382:1
限制:
不支持 mset, transaction:
I think that twemproxy do it right, not supporting multiple keys commands nor transactions. Currently is AFAIK even more strict than Redis Cluster that instead allows MULTI/EXEC blocks if all the commands are about the same key.
对mget, mdel 支持, 性能待测试:
However there is some support for commands with multiple keys. MGET and DEL are handled correctly. Interestingly MGET will split the request among different servers and will return the reply as a single entity. This is pretty cool even if I don't get the right performance numbers with this feature (see later).

So I expected to see almost the same numbers with an MGET as I see when I run the MGET against a single instance
but I get only 50% of the operations per second. Maybe it's the time to reconstruct the reply, I'm not sure.

mget 只有50%
不支持EVAL,
希望: 支持HA
性能: 好!!!
结论: - I strongly suggest Redis users to give it a try.
人们的讨论:
antirez(Redis作者)写过一篇对twemproxy的介绍http://antirez.com/news/44, 他认为twemproxy是目前Redis 分片管理的最好方案,虽然antirez的Redis cluster正在实现并且对其给予厚望
Twemproxy的架构比较清晰,对Twemproxy源码印象较深的是对logging的合理布局和错误处理的清晰,这是第一次看大公司开源出来的代码,非常重视logging和错误处理。
我的fork: 由于Twitter开源的Twemproxy直接使用epoll驱动,导致其他不支持epoll的系统无法使用,因此我fork了一个版本,加入了kqueue支持,让FreeBSD和Mac os x能够成功编译运行
这位同学2013.10 还是一个大四学生. github 上人气挺高: https://github.com/yuyuyu101
http://blog.jpush.cn/redis-twemproxy-benchmark/
http://cloudaice.com/twemproxy-explore/
支持失败节点自动删除
- 可以设置重新连接该节点的时间
- 可以设置连接多少次之后删除该节点
- 该方式适合作为cache存储
支持设置HashTag
- 通过HashTag可以自己设定将两个KEYhash到同一个实例上去。
减少与redis的直接连接数
- 保持与redis的长连接
- 可设置代理与后台每个redis连接的数目
自动分片到后端多个redis实例上
- 多种hash算法(部分还没有研究明白)
- 可以设置后端实例的权重
避免单点问题
- 可以平行部署多个代理层.client自动选择可用的一个
支持redis pipelining request
支持状态监控
- 可设置状态监控ip和端口,访问ip和端口可以得到一个json格式的状态信息串
- 可设置监控信息刷新间隔时间
高吞吐量
- 连接复用,内存复用。
- 将多个连接请求,组成reids pipelining统一向redis请求。
配置部署建议: 编译时候打开logging模块。
hash:
delta:
  listen: 127.0.0.1:22124
  hash: fnv1a_64
  distribution: ketama
  timeout: 100
  auto_eject_hosts: true
  server_retry_timeout: 2000
  server_failure_limit: 1
  servers:
   - 127.0.0.1:11214:1
   - 127.0.0.1:11215:1
   - 127.0.0.1:11216:1
   - 127.0.0.1:11217:1
   - 127.0.0.1:11218:1
   - 127.0.0.1:11219:1
核心是 event , 请求处理 这两块
./event
./event/Makefile.am
./event/nc_epoll.c
./event/nc_event.h
./event/nc_evport.c
./event/nc_kqueue.c
./nc_proxy.c
./nc_proxy.h

./nc_connection.c
./nc_connection.h
./nc_client.c
./nc_client.h
./nc_server.c
./nc_server.h

./nc_message.c
./nc_message.h
./nc_request.c
./nc_response.c

./nc_mbuf.c
./nc_mbuf.h
./nc.c, 处理daemon, pidfile, args, config, 最后:
nc_run(struct instance *nci)
{
    ctx = core_start(nci);
    for (;;) {
        status = core_loop(ctx);
        if (status != NC_OK) {
            break;
        }
    }
    core_stop(ctx);
}
./nc_conf.c
./nc_conf.h
./nc_core.c
./nc_core.h
./nc_log.c
./nc_log.h
./nc_signal.c
./nc_signal.h
./nc_stats.c
./nc_stats.h
./nc_array.c
./nc_array.h
./nc_util.c
./nc_util.h
./nc_queue.h
./nc_rbtree.c
./nc_rbtree.h
./nc_string.c
./nc_string.h
./proto/nc_proto.h
./proto/nc_memcache.c
./proto/nc_redis.c
./hashkit/nc_crc16.c
./hashkit/nc_crc32.c
./hashkit/nc_fnv.c
./hashkit/nc_hashkit.h
./hashkit/nc_hsieh.c
./hashkit/nc_jenkins.c
./hashkit/nc_ketama.c
./hashkit/nc_md5.c
./hashkit/nc_modula.c
./hashkit/nc_murmur.c
./hashkit/nc_one_at_a_time.c
./hashkit/nc_random.c
struct event_base {
    int                ep;      /* epoll descriptor */
    struct epoll_event *event;  /* event[] - events that were triggered */
    int                nevent;  /* # event */
    event_cb_t         cb;      /* event callback */
};


struct event_base *event_base_create(int size, event_cb_t cb);
void event_base_destroy(struct event_base *evb);

int event_add_in(struct event_base *evb, struct conn *c);
int event_del_in(struct event_base *evb, struct conn *c);
int event_add_out(struct event_base *evb, struct conn *c);
int event_del_out(struct event_base *evb, struct conn *c);
int event_add_conn(struct event_base *evb, struct conn *c);
int event_del_conn(struct event_base *evb, struct conn *c);
int event_wait(struct event_base *evb, int timeout);
void event_loop_stats(event_stats_cb_t cb, void *arg);
event_base_create:
struct event_base *
event_base_create(int nevent, event_cb_t cb)
{
    struct event_base *evb = nc_alloc(sizeof(*evb));
    int ep = epoll_create(nevent);
    struct epoll_event *event = nc_calloc(nevent, sizeof(*event));

    evb->ep = ep;
    evb->event = event;
    evb->nevent = nevent;
    evb->cb = cb;

    return evb;
}

int
event_add_in(struct event_base *evb, struct conn *c)
{
    struct epoll_event event;
    event.events = (uint32_t)(EPOLLIN | EPOLLET);
    event.data.ptr = c;

    status = epoll_ctl(evb->ep, EPOLL_CTL_MOD, c->sd, &event);
}

int
event_wait(struct event_base *evb, int timeout)
{
    int ep = evb->ep;
    struct epoll_event *event = evb->event;
    int nevent = evb->nevent;

    for (;;) {
        int i, nsd;

        nsd = epoll_wait(ep, event, nevent, timeout);
        if (nsd > 0) {
            for (i = 0; i < nsd; i++) {
                struct epoll_event *ev = &evb->event[i];
                uint32_t events = 0;

                log_debug(LOG_VVERB, "epoll %04"PRIX32" triggered on conn %p",
                          ev->events, ev->data.ptr);

                if (ev->events & EPOLLERR) {
                    events |= EVENT_ERR;
                }

                if (ev->events & (EPOLLIN | EPOLLHUP)) {
                    events |= EVENT_READ;
                }

                if (ev->events & EPOLLOUT) {
                    events |= EVENT_WRITE;
                }

                if (evb->cb != NULL) {
                    evb->cb(ev->data.ptr, events);
                }
            }
            return nsd;
        }
    }
}
每次调用event_wait, 如果没有事件则一直等, 如果有事件, 调用回调,并返回.
注意: 这里用的都是边缘触发 EPOLLET (redis本身用的是水平触发)
core_ctx_create(){
    /* initialize server pool from configuration */  pool 是一种隔离单位
    status = server_pool_init(&ctx->pool, &ctx->cf->pool, ctx);

    ctx->evb = event_base_create(EVENT_SIZE, &core_core); //这里有个EVENT_SIZE 是1024, core_core 是一个基础回调, 处理读写.
    status = server_pool_preconnect(ctx);
    status = proxy_init(ctx);
}
ctx->evb = event_base_create(EVENT_SIZE, &core_core); //这里有个EVENT_SIZE 是1024, 在epool里面没用, 设置的回调 core_core 是一个基础回调, 处理读写.
event_add_in里面, data.ptr 是一个conn数据结构,
所以,有事件的时候, 调用 core_core(conn, events), 这里events 说明是读还是写事件.
接下来的 proxy_init:
rstatus_t
proxy_each_init(void *elem, void *data) {
    struct server_pool *pool = elem;
    struct conn *p;

    p = conn_get_proxy(pool); //获得一个proxy类型的 conn, 它的回调设置: conn->recv = proxy_recv;
    status = proxy_listen(pool->ctx, p); //做bind/listen/set noblocking/加到epool
}
这里设置的回调 proxy_recv, 就是做accept, 建立与客户端的连接:
rstatus_t
proxy_recv(struct context *ctx, struct conn *conn)
{
    conn->recv_ready = 1;
    do {
        status = proxy_accept(ctx, conn);
        if (status != NC_OK) {
            return status;
        }
    } while (conn->recv_ready);
    return NC_OK;
}
用proxy_accept 与客户端建立连接, 获得client 类型的conn, 并且加入到事件队列:
static rstatus_t
proxy_accept(struct context *ctx, struct conn *p) {
    rstatus_t status;
    struct conn *c;
    int sd;

    for (;;) {//死循环去做. 不带sleep!!
        sd = accept(p->sd, NULL, NULL);
        if (sd < 0) {
            ...
            return NC_ERROR;
        }
        break;
    }

    c = conn_get(p->owner, true, p->redis); //获得一个client类型的连接
    c->sd = sd;

    status = nc_set_nonblocking(c->sd);
    status = event_add_conn(ctx->evb, c);

    return NC_OK;
}
rstatus_t
core_loop(struct context *ctx)
{
    nsd = event_wait(ctx->evb, ctx->timeout);
    ...
}
超清晰的主循环:
static void
nc_run(struct instance *nci)
{
    rstatus_t status;
    struct context *ctx;

    ctx = core_start(nci);
    if (ctx == NULL) {
        return;
    }

    /* run rabbit run */
    for (;;) {
        status = core_loop(ctx);
        if (status != NC_OK) {
            break;
        }
    }

    core_stop(ctx);
}
从数据结构, 函数命令来看, 受到libevnet和nginx的强烈影响.
(redis是自己的事件框架, memcached 就是用libevent作为事件框架)
libevent 的结构大概是这样的(不准确)
event, 类似连接的概念:
struct event {
    TAILQ_ENTRY (event) ev_next;
    TAILQ_ENTRY (event) ev_active_next;
    TAILQ_ENTRY (event) ev_signal_next;
    unsigned int min_heap_idx;  /* for managing timeouts */

    struct event_base *ev_base;

    int ev_fd;
    short ev_events;
event_base是暴露给外面的统一接口:
struct event_base {
    const struct eventop *evsel;
    void *evbase;
    int event_count;        /* counts number of total events */
    int event_count_active; /* counts number of active events */
    ...
}
用法:
//获得listen_fd
listen_fd = network_server_socket(cfg->listen_host, cfg->listen_port);

struct event *ev_accept;
ev_accept = event_new(g_server.event_base, listen_fd, EV_READ | EV_PERSIST, on_accept, NULL);
event_add(ev_accept, NULL);
在 server_pool.h 中注释写的非常清楚, 还有示意图:
*  +-------------+
*  |             |<---------------------+
*  |             |<------------+        |
*  |             |     +-------+--+-----+----+--------------+
*  |   pool 0    |+--->|          |          |              |
*  |             |     | server 0 | server 1 | ...     ...  |
*  |             |     |          |          |              |--+
*  |             |     +----------+----------+--------------+  |
*  +-------------+                                             //
*  |             |
*  |             |
*  |             |
*  |   pool 1    |
*  |             |
*  |             |
*  |             |
*  +-------------+
*  |             |
*  |             |
*  .             .
*  .    ...      .
*  .             .
*  |             |
*  |             |
*  +-------------+
*            |
*            |
*            //
看看twemproxy的配置:
s1:
  listen: 127.0.0.1:22124
  servers:
   - 127.0.0.1:11214:1
   - 127.0.0.1:11215:1
   - 127.0.0.1:11216:1
   - 127.0.0.1:11217:1
s2:
  listen: 127.0.0.1:22125
   - 127.0.0.1:11218:1
   - 127.0.0.1:11219:1
这样的配置就对应着类似这样的结构:

前面event机制提供的事件注册接口, 注册的事件都是在conn上的:
int event_add_in(struct event_base *evb, struct conn *c);
struct conn {
    TAILQ_ENTRY(conn)  conn_tqe;      /* link in server_pool / server / free q */
    void               *owner;        /* connection owner - server_pool / server */
                                     //对于client和proxy, conn->owner 是server_pool 对象
                                     //对于server, conn->owner 是一个server 对象
    ..
    struct msg_tqh     imsg_q;        /* incoming request Q */
    struct msg_tqh     omsg_q;        /* outstanding request Q */

    conn_recv_t        recv;          /* recv (read) handler */
    conn_recv_next_t   recv_next;     /* recv next message handler */
    conn_recv_done_t   recv_done;     /* read done handler */
    conn_send_t        send;          /* send (write) handler */
    conn_send_next_t   send_next;     /* write next message handler */
    conn_send_done_t   send_done;     /* write done handler */
    conn_close_t       close;         /* close handler */
    conn_active_t      active;        /* active? handler */
    ...
};
conn有三种:
三种conn的获取方式和事件处理钩子不一样:
listen: 通过 conn_get_proxy(void *owner) 获取, 只指定了这几个函数:
conn->recv = proxy_recv;
conn->close = proxy_close;
conn->ref = proxy_ref;
conn->unref = proxy_unref;
client: 通过 conn_get(void *owner, bool client=true, bool redis) 获取:
conn->recv = msg_recv;
conn->recv_next = req_recv_next;    //分配下一个读缓冲区.
conn->recv_done = req_recv_done;

conn->send = msg_send;
conn->send_next = rsp_send_next;
conn->send_done = rsp_send_done;
server: , 通过 conn_get(void *owner, bool client=false, bool redis) 获取:
conn->recv = msg_recv;
conn->recv_next = rsp_recv_next;
conn->recv_done = rsp_recv_done;

conn->send = msg_send;
conn->send_next = req_send_next;
conn->send_done = req_send_done;
msg代表一个请求体, 或者一个response, 对于mget之类, 它还会代表原request解析后的一个子request:
struct msg {
    TAILQ_ENTRY(msg)     c_tqe;           /* link in client q */
    TAILQ_ENTRY(msg)     s_tqe;           /* link in server q */
    TAILQ_ENTRY(msg)     m_tqe;           /* link in send q / free q */

    uint64_t             id;              /* message id */
    struct msg           *peer;           /* message peer */
    struct conn          *owner;          /* message owner - client | server */

    struct rbnode        tmo_rbe;         /* entry in rbtree */

    struct mhdr          mhdr;            /* message mbuf header */
    uint32_t             mlen;            /* message length */
    ...
};
msg中用来保存请求/响应 内容的链表, 每个mbuf大小默认是16K, 可以配置, 范围在 512B - 64K 之间
conn和msg的结构:
他们的关系:
./nc_connection.h
./nc_connection.c       //三种连接类型, 对象池处理(conn_get, conn_put), 底层读写(conn_recv, conn_sendv)

./nc_proxy.h
./nc_proxy.c            //建立listen socket(proxy_init), 对新连接做accetp (proxy_recv)

./nc_client.h
./nc_client.c           //判断是否有东西要写给client

./nc_server.h
./nc_server.c           //server, server_pool, 连接后端(server_connect), 后端的连接管理(server_pool_conn)

./nc_message.h
./nc_message.c          //msg 结构.

./nc_request.c
./nc_response.c         //对应的forward, filter 函数

./nc_mbuf.h
./nc_mbuf.c             //msg使用的buf.
rstatus_t
core_core(void *arg, uint32_t events)
{
    conn->events = events;
    if (events & EVENT_ERR) {
        core_error(ctx, conn);
        return NC_ERROR;
    }

    /* read takes precedence over write */
    if (events & EVENT_READ) {
        status = core_recv(ctx, conn); // //简单直接调用 conn->recv
    }
    if (events & EVENT_WRITE) {
        status = core_send(ctx, conn); // //简单直接调用 conn->send
    }

    return NC_OK;
}
核心就是 conn->recv , conn->send, 以及它们的变化.
前面讲到proxy_init通过:
p = conn_get_proxy(pool); 获得一个proxy类型的 conn, 它的回调设置: conn->recv = proxy_recv;
在 proxy_accept 中 accetp到一个连接后, 又通过:
c = conn_get(p->owner, true, p->redis);
获得一个client类型的conn, 这里会把conn->recv设置为 conn->recv = msg_recv, 有数据发来时,就会调用 msg_recv
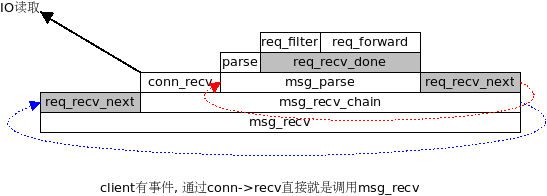
很赞的注释:
*                   nc_connection.[ch]
*                Connection (struct conn)
*                 +         +          +
*                 |         |          |
*                 |       Proxy        |
*                 |     nc_proxy.[ch]  |
*                 /                    \
*              Client                Server
*           nc_client.[ch]         nc_server.[ch]
* nc_message.[ch]
* _message (struct msg)
* + + .
* | | .
* / \ .
* Request Response .../ nc_mbuf.[ch] (mesage buffers)
* nc_request.c nc_response.c .../ nc_memcache.c; nc_redis.c (_message parser)
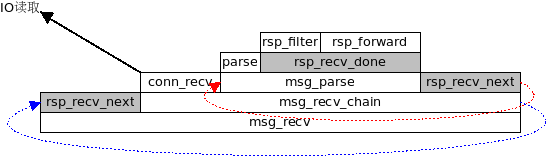
* Messages in nutcracker are manipulated by a chain of processing handlers,
* where each handler is responsible for taking the input and producing an
* output for the next handler in the chain. This mechanism of processing
* loosely conforms to the standard chain-of-responsibility design pattern
* Client+ Proxy Server+
* (nutcracker)
* .
* msg_recv {read event} . msg_recv {read event}
* + . +
* | . |
* \ . /
* req_recv_next . rsp_recv_next
* + . +
* | . | Rsp
* req_recv_done . rsp_recv_done <===
* + . +
* | . |
* Req \ . /
* ===> req_filter* . *rsp_filter
* + . +
* | . |
* \ . /
* req_forward-// (1) . (3) \\-rsp_forward
* .
* .
* msg_send {write event} . msg_send {write event}
* + . +
* | . |
* Rsp' \ . / Req'
* <=== rsp_send_next . req_send_next ===>
* + . +
* | . |
* \ . /
* rsp_send_done-// (4) . (2) //-req_send_done
*
*
* (1) -> (2) -> (3) -> (4) is the normal flow of transaction consisting
* of a single request response, where (1) and (2) handle request from
* client, while (3) and (4) handle the corresponding response from the
* server.
好有爱的注释!!
对应这段注释的代码:
struct conn *
conn_get(void *owner, bool client, bool redis)
{
    struct conn *conn;

    conn = _conn_get();

    conn->client = client ? 1 : 0;

    if (conn->client) {
        /*
         * client receives a request, possibly parsing it, and sends a
         * response downstream.
         */
        conn->recv = msg_recv;
        conn->recv_next = req_recv_next;
        conn->recv_done = req_recv_done;

        conn->send = msg_send;
        conn->send_next = rsp_send_next;
        conn->send_done = rsp_send_done;

        conn->close = client_close;
        conn->active = client_active;

        conn->ref = client_ref;
        conn->unref = client_unref;

        conn->enqueue_inq = NULL;
        conn->dequeue_inq = NULL;
        conn->enqueue_outq = req_client_enqueue_omsgq;
        conn->dequeue_outq = req_client_dequeue_omsgq;
    } else {
        /*
         * server receives a response, possibly parsing it, and sends a
         * request upstream.
         */
        conn->recv = msg_recv;
        conn->recv_next = rsp_recv_next;
        conn->recv_done = rsp_recv_done;

        conn->send = msg_send;
        conn->send_next = req_send_next;
        conn->send_done = req_send_done;

        conn->close = server_close;
        conn->active = server_active;

        conn->ref = server_ref;
        conn->unref = server_unref;

        conn->enqueue_inq = req_server_enqueue_imsgq;
        conn->dequeue_inq = req_server_dequeue_imsgq;
        conn->enqueue_outq = req_server_enqueue_omsgq;
        conn->dequeue_outq = req_server_dequeue_omsgq;
    }

    conn->ref(conn, owner);

    return conn;
}
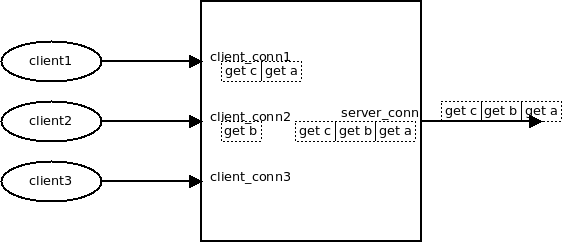
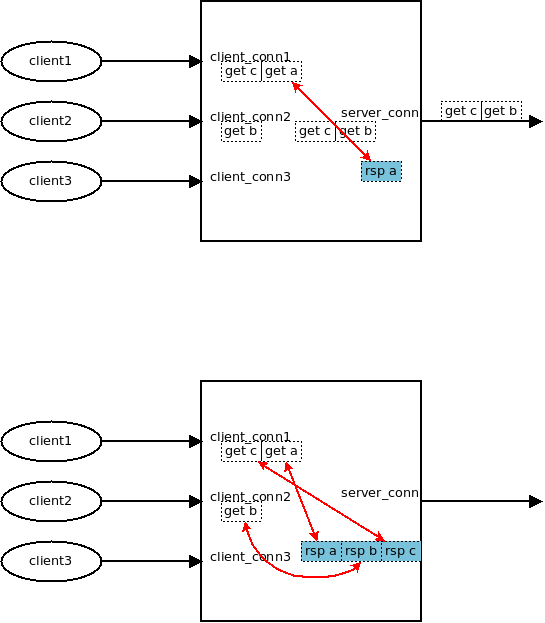
考察只有一个后端的情况, 假设有2个client要发送3个请求过来
此时回调函数:
conn->recv = msg_recv;
conn->recv_next = req_recv_next;
conn->recv_done = req_recv_done;
函数调用栈:
每次发生 req_recv_done(req_forward), 就会调用 req_forward()
req_forward(struct context *ctx, struct conn *c_conn, struct msg *msg)
{
    if (!msg->noreply) {
        c_conn->enqueue_outq(ctx, c_conn, msg);
    }

    //获得到后端的连接. (可能是新建, 或者从pool里面获取)
    s_conn = server_pool_conn(ctx, c_conn->owner, key, keylen);

    s_conn->enqueue_inq(ctx, s_conn, msg);
    event_add_out(ctx->evb, s_conn);
}
就有一个msg就出现在client_conn->out_q, 同时出现在server_conn->in_q
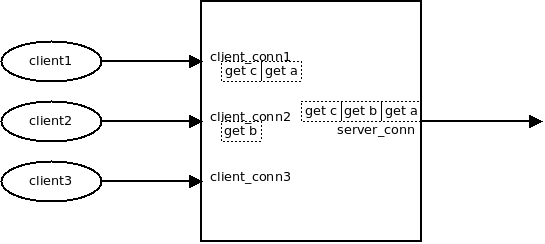
req_forward用server_pool_conn获得一个server_conn.
对于server_conn来说, 因为挂了epoll_out事件, 很快就会调用 conn->send,也就是msg_send.
此时:
conn->send = msg_send;
conn->send_next = req_send_next;
conn->send_done = req_send_done;
调用栈:
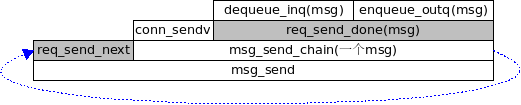
#这时, 每次发生 req_send_done, 这个msg就被放到server_conn->out_q
注意, 此时两个msg依然在client_conn->in_q里面
因为server_conn的 epoll_in是一直开着的, 响应很快回来后, 就到了server_conn的 msg_recv 这个过程和调用栈1类似,不过两个函数钩子不一样(图中灰色框)
conn->recv = msg_recv;(和<1>一样)
conn->recv_next = rsp_recv_next;
conn->recv_done = rsp_recv_done;
这里 rsp_recv_next 的作用是, 拿到下一个要接收的msg
rsp_forward 会把 msg从 server_conn->outq 里面摘掉, 同时设置req和resp之间的一一对应关系
//establish msg <-> pmsg (response <-> request) link
pmsg->peer = msg;
msg->peer = pmsg;
上面这个代码是整个过程的精华所在
这时候, client的q_out上排队的req, 就有了对应的response
这时也会设置:
event_add_out(ctx->evb, c_conn);
每收到一个rsp, 就从server_conn的out_q摘掉, 并设置一一对应关系, 如下:
输入是通过mbuf 链表 来保存, 不会做realloc()
mbuf大小默认是16K, 可以配置, 范围在 512B - 64K 之间
mbuf, msg, conn等都有对象池, 减少对象分配:
struct context *
core_start(struct instance *nci)
{
    mbuf_init(nci);     //mbuf内存池
    msg_init();         //msg池
    conn_init();        //连接对象池
}
请求是会被pipeline到后端的 就是说, 不必等proxy接收完整的请求, 再传给后端, 解析出一个msg, 就传給后端(如果msg比较大, 比如set 一个10M的对象, 效率就会比较低) 得到一个request_msg, 就转给后端, 在后端响应之前, 请求的msg 是不会销毁的. 得到后端response_msg后, request_msg 和response_msg 一起回到内存池.
后端连接池的处理:
struct conn *
server_conn(struct server *server)
{
    struct server_pool *pool;
    struct conn *conn;

    pool = server->owner;

    if (server->ns_conn_q < pool->server_connections) {
        return conn_get(server, false, pool->redis);
    }
    ASSERT(server->ns_conn_q == pool->server_connections);

    /*
     * 这里只是简单的转了一下, 如果一个conn正在使用, 那么它也会返回, 也就是说一个server conn会同时被 两个client conn使用.
     */
    conn = TAILQ_FIRST(&server->s_conn_q);
    ASSERT(!conn->client && !conn->proxy);

    TAILQ_REMOVE(&server->s_conn_q, conn, conn_tqe);
    TAILQ_INSERT_TAIL(&server->s_conn_q, conn, conn_tqe);

    return conn;
}
这个连接池会受到每个server多少个后端连接这样一个限制, 如果没达到限制, 那么一定是创建连接. 如果达到限制了, 一定是返回其中一个连接.
所以
因为需要从mbuf链表里面解析, 解析器是手工打造的.. 这里暂时不去分析它.
twemproxy支持的hash方法:
我们看hashkit/nc_hashkit.h 中的这个定义:
#define HASH_CODEC(ACTION)                      \
    ACTION( HASH_ONE_AT_A_TIME, one_at_a_time ) \
    ACTION( HASH_MD5,           md5           ) \
    ACTION( HASH_CRC16,         crc16         ) \
    ACTION( HASH_CRC32,         crc32         ) \
    ACTION( HASH_CRC32A,        crc32a        ) \
    ACTION( HASH_FNV1_64,       fnv1_64       ) \
    ACTION( HASH_FNV1A_64,      fnv1a_64      ) \
    ACTION( HASH_FNV1_32,       fnv1_32       ) \
    ACTION( HASH_FNV1A_32,      fnv1a_32      ) \
    ACTION( HASH_HSIEH,         hsieh         ) \
    ACTION( HASH_MURMUR,        murmur        ) \
    ACTION( HASH_JENKINS,       jenkins       ) \

#define DEFINE_ACTION(_hash, _name) _hash,
typedef enum hash_type {
    HASH_CODEC( DEFINE_ACTION )
    HASH_SENTINEL
} hash_type_t;
#undef DEFINE_ACTION
这个宏显得有些复杂, 我们用 gcc -E 展开来看看:
$ gcc -E hashkit/nc_hashkit.h
...
typedef enum hash_type {
    HASH_ONE_AT_A_TIME, HASH_MD5, HASH_CRC16, HASH_CRC32, HASH_CRC32A, HASH_FNV1_64, HASH_FNV1A_64, HASH_FNV1_32, HASH_FNV1A_32, HASH_HSIEH, HASH_MURMUR, HASH_JENKINS,
    HASH_SENTINEL
} hash_type_t;
在这个 enum定义之后, 是这些函数定义:
uint32_t hash_one_at_a_time(const char *key, size_t key_length);
void md5_signature(const unsigned char *key, unsigned int length, unsigned char *result);
uint32_t hash_md5(const char *key, size_t key_length);
uint32_t hash_crc16(const char *key, size_t key_length);
uint32_t hash_crc32(const char *key, size_t key_length);
uint32_t hash_crc32a(const char *key, size_t key_length);
uint32_t hash_fnv1_64(const char *key, size_t key_length);
uint32_t hash_fnv1a_64(const char *key, size_t key_length);
uint32_t hash_fnv1_32(const char *key, size_t key_length);
uint32_t hash_fnv1a_32(const char *key, size_t key_length);
uint32_t hash_hsieh(const char *key, size_t key_length);
uint32_t hash_jenkins(const char *key, size_t length);
uint32_t hash_murmur(const char *key, size_t length);
在配置文件解析的时候, 用户指定一个hash函数名字, 需要解析为conf_pool.hash:
struct conf_pool {
    struct string      name;                  /* pool name (root node) */
    struct conf_listen listen;                /* listen: */
    hash_type_t        hash;                  /* hash: */
}

char *
conf_set_hash(struct conf *cf, struct command *cmd, void *conf)
{
    struct string *value, *hash;
    for (hash = hash_strings; hash->len != 0; hash++) {
        if (string_compare(value, hash) != 0) {
            continue;
        }

        *hp = hash - hash_strings;
        return CONF_OK;
    }
    return "is not a valid hash";
}
这里的hash_strings是在 nc_conf.c里定义的:
#define string(_str)   { sizeof(_str) - 1, (uint8_t *)(_str) }
#define DEFINE_ACTION(_hash, _name) string(#_name),
static struct string hash_strings[] = {
    HASH_CODEC( DEFINE_ACTION )
    null_string
};
#undef DEFINE_ACTION
展开得到的是:
gcc -E nc_conf.c  -I ./ | vim -
static struct string hash_strings[] = {
    { sizeof("one_at_a_time") - 1, (uint8_t *)("one_at_a_time") }, { sizeof("md5") - 1, (uint8_t *)("md5") }, { sizeof("crc16") - 1, (uint8_t *)("crc16") }, { sizeof("crc32") - 1, (uint8_t *)("crc32") }, { sizeof("crc32a") - 1, (uint8_t *)("crc32a") }, { sizeof("fnv1_64") - 1, (uint8_t *)("fnv1_64") }, { sizeof("fnv1a_64") - 1, (uint8_t *)("fnv1a_64") }, { sizeof("fnv1_32") - 1, (uint8_t *)("fnv1_32") }, { sizeof("fnv1a_32") - 1, (uint8_t *)("fnv1a_32") }, { sizeof("hsieh") - 1, (uint8_t *)("hsieh") }, { sizeof("murmur") - 1, (uint8_t *)("murmur") }, { sizeof("jenkins") - 1, (uint8_t *)("jenkins") },
    { 0, ((void *)0) }
};
配置文件解析后, 被加载到server_pool里面:
typedef uint32_t (*hash_t)(const char *, size_t);
struct server_pool {
    int                dist_type;            /* distribution type (dist_type_t) */
    int                key_hash_type;        /* key hash type (hash_type_t) */
    hash_t             key_hash;             /* key hasher */
}

#这个宏定义一个函数列表
#define DEFINE_ACTION(_hash, _name) hash_##_name,
static hash_t hash_algos[] = {
    HASH_CODEC( DEFINE_ACTION )
    NULL
};
#undef DEFINE_ACTION
展开后:
static hash_t hash_algos[] = {
    hash_one_at_a_time, hash_md5, hash_crc16, hash_crc32, hash_crc32a, hash_fnv1_64, hash_fnv1a_64, hash_fnv1_32, hash_fnv1a_32, hash_hsieh, hash_murmur, hash_jenkins,
    ((void *)0)
};
最后, 利用conf中解析出来的 cp->hash 为下标, 直接去这个数组的函数指针即可:
sp->key_hash = hash_algos[cp->hash];
crc32是设计来计算校验码的, 并不适合算hash.
twemproxy 0.2.4 里面包含的crc32算法 crc32使用的是 memcache 用的crc32. 最新的版本里面包含了一个 crc32a, 才是原来含义上的crc32:
用 crc32a , 我们才能用这段代码计算key被分布到哪里去了:
import binascii
word = 'hello'
crc32 =  binascii.crc32(word) & 0xffffffff
print '%08x' % crc32, crc32%4
The Jenkins hash functions are a collection of (non-cryptographic) hash functions for multi-byte keys designed by Bob Jenkins. They can be used also as checksums
uint32_t jenkins_one_at_a_time_hash(char *key, size_t len)
{
    uint32_t hash, i;
    for(hash = i = 0; i < len; ++i)
    {
        hash += key[i];
        hash += (hash << 10);
        hash ^= (hash >> 6);
    }
    hash += (hash << 3);
    hash ^= (hash >> 11);
    hash += (hash << 15);
    return hash;
}
Fowler–Noll–Vo is a non-cryptographic hash function created by Glenn Fowler, Landon Curt Noll, and Phong Vo.
FNV-1实现简单:
hash = FNV_offset_basis
for each octet_of_data to be hashed
     hash = hash × FNV_prime
     hash = hash XOR octet_of_data
return hash
FNV-1a, reverses the multiply and XOR steps.
designed primarily for hashtable and checksum use(不适合作为加密用的hash函数)
特点:
MurmurHash performed well in a random distribution of regular keys.[7]
这些都用了:
libstdc++ (ver 4.6), Perl,[24] nginx (ver 1.0.1),[25] Rubinius,[26] libmemcached (the C driver for Memcached),[27] maatkit,[28] Hadoop,[1] Kyoto Cabinet,[29], RaptorDB[30], and Cassandra.[31]
hash函数的几个要求: 1. 均匀性(排除crc32) 2. 速度 3. 如果能用python/php计算 hash更好.
时间消耗上, 大致是:
Murmur/Jenkins(2s) < FNV(4s) < CRC32(5s)
应该选择Murmur或者FNV-1
参考:
twemproxy 的github上一般都是用 fnv1a_64:
我们可以用下面这段python实现:
#/home/ning/idning/langtest/python/fnv
def hash_fnv1a_64(s):
    UINT32_MAX=2**32
    FNV_64_INIT = 0xcbf29ce484222325 % UINT32_MAX
    FNV_64_PRIME = 0x100000001b3 % UINT32_MAX

    hval = FNV_64_INIT
    for c in s:
        hval = hval ^ ord(c)
        hval = (hval * FNV_64_PRIME) % UINT32_MAX
    return hval
相比起来, 对应的murmur要复杂些, 所以我们选择 fnv1a_64
一个proxy为什么需要rbtree?? 用来做某种超时:
static struct rbtree tmo_rbt;    /* timeout rbtree */

void
msg_tmo_insert(struct msg *msg, struct conn *conn)
{
    struct rbnode *node;
    int timeout;

    timeout = server_timeout(conn);
    if (timeout <= 0) {
        return;
    }

    node = &msg->tmo_rbe;
    node->key = nc_msec_now() + timeout;
    node->data = conn;

    rbtree_insert(&tmo_rbt, node);
}
active 和ready变量
ngx_int_t
ngx_handle_read_event(ngx_event_t *rev, ngx_uint_t flags)
{
    if (ngx_event_flags & NGX_USE_CLEAR_EVENT) {

        /* kqueue, epoll */

        if (!rev->active && !rev->ready) {
            if (ngx_add_event(rev, NGX_READ_EVENT, NGX_CLEAR_EVENT)
                == NGX_ERROR)
            {
                return NGX_ERROR;
            }
        }

        return NGX_OK;
代码质量非常好, 举例
函数开始写ASSERT:
int
event_wait(struct event_base *evb, int timeout)
{
    int ep = evb->ep;
    struct epoll_event *event = evb->event;
    int nevent = evb->nevent;

    ASSERT(ep > 0);
    ASSERT(event != NULL);
    ASSERT(nevent > 0);
类名, 函数名, 注释都很赞.
状态变迁: 因为逻辑相对简单, 不需要保存状态, 所以只是有一个conn.client 标志表示状态, 不需要一个状态机, 机制不同
从这个配置看, 完全的nginx风格:
static struct command conf_commands[] = {
    { string("listen"),
      conf_set_listen,
      offsetof(struct conf_pool, listen) },

    { string("hash"),
      conf_set_hash,
      offsetof(struct conf_pool, hash) },

    { string("hash_tag"),
      conf_set_hashtag,
      offsetof(struct conf_pool, hash_tag) },

    { string("server_connections"),
      conf_set_num,
      offsetof(struct conf_pool, server_connections) },

    null_command
};
这个 pool->server_connections 一般都没有配置(默认值是1. 虽然一个连接可能可以应付绝大多数场景, 个人感觉这必须配置啊!!!)
也就是说 不管前端多少个client, 到后端redis, 就只有1个连接. -- 这是这种proxy的特色
通过msg->peer 和msg->owner 耦合client_conn与server_conn
非常巧妙的设计, 多个前端, 可以同时复用后端的 一个连接
//下面这里建立的link是保证客户端收到的请求和响应一一对应的关键.
//client_conn->out_q 里面还保存着按照发送顺序的请求msg. 这里收到了response 的msg之后.
//一一对应起来, 向客户端返回response的时候, 按照 client_conn->out_q的顺序, 看相应的
//msg 的peer是否被设置了, 如果设置了, 就可以返回.  //
这也是与一般的proxy不一样的地方, 一般的proxy, 收到client_conn_1消息, 处理后找个后端连接发过去, 此时这个后端连接是不会被其它客户端连接复用的, 而这时收到的response也就必然是client_conn_1对应的response, 直接放到client_conn1的输出队列即可.:
//
/* establish msg <-> pmsg (response <-> request) link */
pmsg->peer = msg;
msg->peer = pmsg;
这里proxy必须保存req msg的body和resp msg的body, 如果后端网络/响应慢, 则req msg撑爆内存, 如果前端不读取, 则rsp msg撑爆内存.
有两种debug: log_debug输出到日志和ASSERT:
flag                         log    ASSERT
--enable-debug=no       =>   0      啥也不做
--enable-debug=log      =>   1      啥也不做
--enable-debug=yes      =>   1      出错时打日志
--enable-debug=full     =>   1      出错时core
configure.ac:
AS_CASE([x$enable_debug],
  [xfull], [AC_DEFINE([HAVE_ASSERT_PANIC], [1],
                      [Define to 1 if panic on an assert is enabled])
            AC_DEFINE([HAVE_DEBUG_LOG], [1], [Define to 1 if debug log is enabled])
           ],
  [xyes], [AC_DEFINE([HAVE_ASSERT_LOG], [1],
                     [Define to 1 if log on an assert is enabled])
           AC_DEFINE([HAVE_DEBUG_LOG], [1], [Define to 1 if debug log is enabled])
          ],
  [xlog], [AC_DEFINE([HAVE_DEBUG_LOG], [1], [Define to 1 if debug log is enabled])],
  [xno], [],
  [AC_MSG_FAILURE([invalid value ${enable_debug} for --enable-debug])])
AC_MSG_RESULT($enable_debug)
./configure --enable-debug=log
有些老的gcc可能会core
比如:
https://github.com/twitter/twemproxy/issues/115 https://github.com/twitter/twemproxy/issues/146
in my machine(centos6.3):
$ gcc -v
Using built-in specs.
Target: x86_64-redhat-linux
Thread model: posix
gcc version 4.4.6 20120305 (Red Hat 4.4.6-4) (GCC)
debug=no:
./configure  && make clean && make -j 8                                         => core
./configure CFLAGS="-O1 -g3" && make clean && make -j 8                         => ok
./configure CFLAGS="-O2 -g3" && make clean && make -j 8                         => core
./configure CFLAGS="-O3 -g3" && make clean && make -j 8                         => core
debug=log:
./configure --enable-debug=log && make clean && make -j 8                       => core
./configure CFLAGS="-O1 -g3" --enable-debug=log && make clean && make -j 8      => ok
./configure CFLAGS="-O2 -g3" --enable-debug=log && make clean && make -j 8      => core
./configure CFLAGS="-O3 -g3" --enable-debug=log && make clean && make -j 8      => core
debug=full:
./configure --enable-debug=full && make clean && make -j 8                      => ok
./configure CFLAGS="-O1 -g3" --enable-debug=full && make clean && make -j 8     => ok
./configure CFLAGS="-O2 -g3" --enable-debug=full && make clean && make -j 8     => ok
./configure CFLAGS="-O3 -g3" --enable-debug=full && make clean && make -j 8     => ok
在configure里面写了, 默认是-O2(看直接./configure 之后make的输出, 也能看到-O2):
elif test $ac_cv_prog_cxx_g = yes; then
  if test "$GXX" = yes; then
    CXXFLAGS="-g -O2"
  else
    CXXFLAGS="-g"
  fi
else
  if test "$GXX" = yes; then
    CXXFLAGS="-O2"
  else
    CXXFLAGS=
  fi
fi
比较优化选项:
$ gcc -c -Q -O1 --help=optimizers > /tmp/o1
$ gcc -c -Q -O2 --help=optimizers > /tmp/o2

-finline-small-functions
分别用-O1 和-O2生成的二进制, 看某个函数的汇编, 差别太大了:
objdump -d src/nutcracker.o1
对函数禁止优化:
有时候,我们希望对某个函数或者某块代码添加自己的优化选项
这个可以通过下面的宏实现:
对代码块的优化/禁止优化:
#pragma GCC push_options
#pragma GCC optimize ("O0")

your code

#pragma GCC pop_options
to disable optimizations since GCC 4.4.
对函数的优化/禁止优化:
__attribute__((optimize("O0")))
写了个脚本逐一去掉 -O2的选项:
cd ~/twemproxy && ./configure CFLAGS="-O1 -falign-functions -falign-jumps -falign-labels -falign-loops -fcaller-saves -fcrossjumping -fcse-follow-jumps -fdelete-null-pointer-checks -fexpensive-optimizations -fforward-propagate -fgcse -finline-small-functions -fipa-cp -foptimize-register-move -foptimize-sibling-calls -fpeephole2 -fregmove -freorder-blocks -freorder-functions -frerun-cse-after-loop -fschedule-insns2 -fstrict-aliasing" && make clean && make -j 8
去掉 -fstrict-aliasing 就好.
带 -fstrict-aliasing 就会出问题.
下面的就ok:
./configure CFLAGS="-O3 -fno-strict-aliasing" && make clean && make
一般运行的时候需要指定一个pid文件, 如果这个命令连续运行两次, 则pid文件被清除:
ning@ning-laptop /tmp/r/nutcracker-22000$ ll log/
total 16K
928376 -rw-r--r-- 1 ning ning 12K 2013-12-20 15:36 nutcracker-22000.log
928377 -rw-r--r-- 1 ning ning   5 2013-12-20 15:36 nutcracker-22000.pid
ning@ning-laptop /tmp/r/nutcracker-22000$ bin/nutcracker -d -c /tmp/r/nutcracker-22000/conf/nutcracker-22000.conf -o /tmp/r/nutcracker-22000/log/nutcracker-22000.log -p /tmp/r/nutcracker-22000/log/nutcracker-22000.pid -s 23000
ning@ning-laptop /tmp/r/nutcracker-22000$ ll log/
total 12K
928376 -rw-r--r-- 1 ning ning 12K 2013-12-20 15:36 nutcracker-22000.log
因为第二个进程会启动后 先写pid文件, 发现listen失败, 就退出, 同时清空pid文件. 应该修改一下, 如果pid文件已经存在, 拒绝启动
同时, 我们的部署脚本, 也需要一个kill任务. 强制kill
redis 本身就是先listen, 后写pid文件.
listen:
cluster0:
    listen: 127.0.0.5:22000
这是进程只会监听127.0.0.5 上的端口:
tcp 0 0 127.0.0.5:22000 0.0.0.0:* LISTEN 8581/nutcracker
需要改成:
cluster0:
    listen: 0.0.0.0:22000

    tcp        0      0 0.0.0.0:22000           0.0.0.0:*               LISTEN      19902/nutcracker
alpha:
  listen: 127.0.0.1:22121
  hash: fnv1a_64
  distribution: ketama
  auto_eject_hosts: true
  redis: true
  server_retry_timeout: 2000
  server_failure_limit: 1
  servers:
   - 127.0.0.1:6379:1
下面选项只在auto_eject_hosts时有用
这一块的代码 modula_update 还没仔细看
默认情况下, twemproxy一直等着把请求传给后端, 但是如果等了timeout时间, proxy 就不会把这个请求传给后端, 而是向客户端回复一个
SERVER_ERROR Connection timed outrn is sent back to the client.
编译时加上log选项, 设为 LOG_INFO
可以在启动时指定:
$ ./bin/nutcracker -h
This is nutcracker-0.2.4

Usage: nutcracker [-?hVdDt] [-v verbosity level] [-o output file]
                  [-c conf file] [-s stats port] [-a stats addr]
                  [-i stats interval] [-p pid file] [-m mbuf size]

Options:
  -h, --help             : this help
  -V, --version          : show version and exit
  -t, --test-conf        : test configuration for syntax errors and exit
  -d, --daemonize        : run as a daemon
  -D, --describe-stats   : print stats description and exit
  -v, --verbosity=N      : set logging level (default: 5, min: 0, max: 11)
  -o, --output=S         : set logging file (default: stderr)
  -c, --conf-file=S      : set configuration file (default: conf/nutcracker.yml)
  -s, --stats-port=N     : set stats monitoring port (default: 22222)
  -a, --stats-addr=S     : set stats monitoring ip (default: 0.0.0.0)
  -i, --stats-interval=N : set stats aggregation interval in msec (default: 30000 msec)
  -p, --pid-file=S       : set pid file (default: off)
  -m, --mbuf-size=N      : set size of mbuf chunk in bytes (default: 16384 bytes)
对memcache: ascii protocol key最多 250 characters. The key should not include whitespace, or 'r' or 'n' character.
redis 没有这个限制
如果client想要在一个pipeline里面读到最新的写, 就要设置server_connections:1, 如果我们设置 server_connections:2
那么:
set foo bar
get foo
后面这个get可能在另一个连接里面发过去, 所以不一定能读到 set foo bar 的结果
cluster0 = {
    'cluster_name': 'cluster0',
    'user': 'ning',
    'sentinel':[
        ('127.0.0.5:21001', '/tmp/r/sentinel-21001'),
        ('127.0.0.5:21002', '/tmp/r/sentinel-21002'),
        ('127.0.0.5:21003', '/tmp/r/sentinel-21003'),
    ],
    'redis': [
        # master(host:port, install path)       ,  slave(host:port, install path)
        ('127.0.0.5:20000', '/tmp/r/redis-20000'), ('127.0.0.5:30000', '/tmp/r/redis-30000'),
        ('127.0.0.5:20001', '/tmp/r/redis-20001'), ('127.0.0.5:30001', '/tmp/r/redis-30001'),
        ('127.0.0.5:20002', '/tmp/r/redis-20002'), ('127.0.0.5:30002', '/tmp/r/redis-30002'),
        ('127.0.0.5:20003', '/tmp/r/redis-20003'), ('127.0.0.5:30003', '/tmp/r/redis-30003'),
    ],
    'nutcracker': [
        ('127.0.0.5:22000', '/tmp/r/nutcracker-22000'),
        ('127.0.0.5:22001', '/tmp/r/nutcracker-22001'),
        ('127.0.0.5:22002', '/tmp/r/nutcracker-22002'),
    ],
}
对redis的benchmark(在我自己机器上):
$ redis-benchmark -h 127.0.0.5 -p 20000 -t get,set -n 1000000
====== SET ======
  1000000 requests completed in 18.65 seconds
  50 parallel clients
  3 bytes payload
  keep alive: 1

86.50% <= 1 milliseconds
99.66% <= 2 milliseconds
53613.55 requests per second

====== GET ======
  1000000 requests completed in 16.25 seconds
  50 parallel clients
  3 bytes payload
  keep alive: 1

99.25% <= 1 milliseconds
99.89% <= 2 milliseconds
61557.40 requests per second
对proxy 的benchmark:
$ redis-benchmark -h 127.0.0.5 -p 22000 -t get,set -n 1000000
====== SET ======
  1000000 requests completed in 21.45 seconds
  50 parallel clients
  3 bytes payload
  keep alive: 1

86.42% <= 1 milliseconds
99.76% <= 2 milliseconds
46628.74 requests per second

====== GET ======
  1000000 requests completed in 48.91 seconds
  50 parallel clients
  3 bytes payload
  keep alive: 1

30.70% <= 1 milliseconds
44.95% <= 2 milliseconds
20445.30 requests per second
高并发先, 直连redis性能差, cpu都起不来.
我们如果编译debug版本:
cd nutcracker-0.2.4/ && ./configure CFLAGS="-O1" --enable-debug=full --prefix=`pwd`/../output && make -j 8 && make install
默认的日志级别是5, 就会有很多连接日志:
[Mon Jan 20 09:44:01 2014] nc_core.c:207 close c 12 '127.0.0.5:52020' on event 0001 eof 1 done 1 rb 26714 sb 13301
[Mon Jan 20 09:44:01 2014] nc_proxy.c:337 accepted c 12 on p 11 from '127.0.0.5:52021'
[Mon Jan 20 09:44:02 2014] nc_core.c:207 close c 12 '127.0.0.5:52021' on event 0001 eof 1 done 1 rb 26741 sb 13315
[Mon Jan 20 09:44:02 2014] nc_proxy.c:337 accepted c 12 on p 11 from '127.0.0.5:52022'
[Mon Jan 20 09:44:04 2014] nc_core.c:207 close c 12 '127.0.0.5:52022' on event 0001 eof 1 done 1 rb 26768 sb 13329
[Mon Jan 20 09:44:04 2014] nc_proxy.c:337 accepted c 12 on p 11 from '127.0.0.5:52024'
[Mon Jan 20 09:44:05 2014] nc_core.c:207 close c 12 '127.0.0.5:52024' on event 0001 eof 1 done 1 rb 26795 sb 13343
[Mon Jan 20 09:44:05 2014] nc_proxy.c:337 accepted c 12 on p 11 from '127.0.0.5:52025'
[Mon Jan 20 09:44:06 2014] nc_core.c:207 close c 12 '127.0.0.5:52025' on event 0001 eof 1 done 1 rb 26822 sb 13357
[Mon Jan 20 09:44:06 2014] nc_proxy.c:337 accepted c 12 on p 11 from '127.0.0.5:52026'
[Mon Jan 20 09:44:07 2014] nc_core.c:207 close c 12 '127.0.0.5:52026' on event 0001 eof 1 done 1 rb 26849 sb 13371
[Mon Jan 20 09:44:07 2014] nc_proxy.c:337 accepted c 12 on p 11 from '127.0.0.5:52027'
[Mon Jan 20 09:44:08 2014] nc_core.c:207 close c 12 '127.0.0.5:52027' on event 0001 eof 1 done 1 rb 26876 sb 13385
[Mon Jan 20 09:44:08 2014] nc_proxy.c:337 accepted c 12 on p 11 from '127.0.0.5:52028'
处理方法:
$ ./bin/nutcracker -h
This is nutcracker-0.2.4

Usage: nutcracker [-?hVdDt] [-v verbosity level] [-o output file]
                  [-c conf file] [-s stats port] [-a stats addr]
                  [-i stats interval] [-p pid file] [-m mbuf size]

Options:
  -h, --help             : this help
  -V, --version          : show version and exit
  -t, --test-conf        : test configuration for syntax errors and exit
  -d, --daemonize        : run as a daemon
  -D, --describe-stats   : print stats description and exit
  -v, --verbosity=N      : set logging level (default: 5, min: 0, max: 11)
  -o, --output=S         : set logging file (default: stderr)
  -c, --conf-file=S      : set configuration file (default: conf/nutcracker.yml)
  -s, --stats-port=N     : set stats monitoring port (default: 22222)
  -a, --stats-addr=S     : set stats monitoring ip (default: 0.0.0.0)
  -i, --stats-interval=N : set stats aggregation interval in msec (default: 30000 msec)
  -p, --pid-file=S       : set pid file (default: off)
  -m, --mbuf-size=N      : set size of mbuf chunk in bytes (default: 16384 bytes)
使用 nutcracker -v 0 即可
case SIGTTIN:
    actionstr = ", up logging level";
    action = log_level_up;
    break;

case SIGTTOU:
    actionstr = ", down logging level";
    action = log_level_down;
    break;

case SIGHUP:
    actionstr = ", reopening log file";
    action = log_reopen;
    break;
所以:
kill -s TTOU 23787
日志显示:
[Mon Jan 20 09:44:09 2014] nc_signal.c:122 signal 22 (SIGTTOU) received, down logging level
[Mon Jan 20 09:44:09 2014] nc_log.c:95 down log level to 4
此时就没有连接日志了.
如果想要多看日志:
kill -s TTIN 15797
如果我们需要用日志统计流量, 客户端信息, 可以切日志, 方法:
ning@ning-laptop /tmp/r/nutcracker-22000$ mv log/nutcracker.log log/nutcracker.log.20140120
ning@ning-laptop /tmp/r/nutcracker-22000$ ll log/
total 124K
813654 -rw-r--r-- 1 ning ning 114K 2014-01-20 09:44 nutcracker.log.20140120
813655 -rw-r--r-- 1 ning ning    5 2014-01-20 09:33 nutcracker.pid
ning@ning-laptop /tmp/r/nutcracker-22000$ cat log/nutcracker.pid
23787

#doit
ning@ning-laptop /tmp/r/nutcracker-22000$ cat log/nutcracker.pid | xargs kill -s HUP
ning@ning-laptop /tmp/r/nutcracker-22000$ ll log/
total 124K
813688 -rw-r--r-- 1 ning ning    0 2014-01-20 09:49 nutcracker.log
813654 -rw-r--r-- 1 ning ning 114K 2014-01-20 09:49 nutcracker.log.20140120
813655 -rw-r--r-- 1 ning ning    5 2014-01-20 09:33 nutcracker.pid
0配置, 利用sentinel用的方式, 获知sentinel的位置.
如果一主一丛, 主彻底挂了, 从应该是提升为主, 而給老主发的
速度提高, 内存消耗减少(一般消息都小于512字节)
注意: 不能滥用, twemproxy实现里面, 一个key必须放在一个mbuf里面(解析器, 为了防止拷贝数据做的限制), 所以, 如果key长度大于mbuf大小, 会打印错误:
if (r->rlen >= mbuf_data_size()) {
    log_error("parsed bad req %"PRIu64" of type %d with key "
              "length %d that greater than or equal to maximum"
              " redis key length of %d", r->id, r->type,
              r->rlen, mbuf_data_size());
    goto error;
}
Mbuf enables zero copy for requests and responses flowing through the proxy. By default an mbuf is 16K

nutcracker requires the key to be stored in a contiguous memory region. Since all requests and responses in nutcracker are stored in mbuf, the maximum length of the redis key is limited by the size of the maximum available space for data in mbuf (mbuf_data_size()).
[Tue Dec 24 21:10:20 2013] nc_util.c:291 [0] /lib64/tls/libpthread.so.0 [0x302b80c420]
[Tue Dec 24 21:10:20 2013] nc_util.c:291 [1] bin/nutcracker(server_unref+0x5a) [0x405f7a]
[Tue Dec 24 21:10:20 2013] nc_util.c:291 [2] bin/nutcracker(server_close+0x1ae) [0x40681e]
[Tue Dec 24 21:10:20 2013] nc_util.c:291 [3] bin/nutcracker(core_loop+0x89) [0x4054d9]
[Tue Dec 24 21:10:20 2013] nc_util.c:291 [4] bin/nutcracker(main+0x4b5) [0x40f1c5]
[Tue Dec 24 21:10:20 2013] nc_util.c:291 [5] /lib64/tls/libc.so.6(__libc_start_main+0xdb) [0x302af1c4bb]
[Tue Dec 24 21:10:20 2013] nc_util.c:291 [6] bin/nutcracker [0x40507a]
[Tue Dec 24 21:10:20 2013] nc_signal.c:122 signal 11 (SIGSEGV) received, core dumping


似乎是这个问题: https://github.com/twitter/twemproxy/issues/146
https://github.com/twitter/twemproxy/issues/203
ning@ning-laptop:~/idning-github/redis-mgr$ cat tests/a.py
import socket
import time

HOST = '127.0.0.5'
PORT = 24000

s = socket.socket(socket.AF_INET, socket.SOCK_STREAM)
s.connect((HOST, PORT))

data = '*3\r\n$3\r\nSET\r\n$13\r\nkkk-100001480\r\n$13\r\nvvv-100001480\r\n'
for i in range(100*1000):
    s.sendall(data)

ning@ning-laptop:~/idning-github/redis-mgr$ time python tests/a.py

real        0m0.797s
user        0m0.280s
sys 0m0.120s
I found that twemproxy consume 1.6G of memeory, and the memory will not free after the client shutdown:
ning@ning-laptop:/tmp/r/nutcracker-24000$ ps aux | grep nut
ning      2017  0.5 14.8 1652068 1186692 ?     Sl   09:43   0:00 bin/nutcracker -d -c /tmp/r/nutcracker-24000/conf/nutcracker.conf -o /tmp/r/nutcracker-24000/log/nutcracker.log -p /tmp/r/nutcracker-24000/log/nutcracker.pid -s 25000 -v 4

100*1000*52(msg length) = 5MB
send 5MB to twemproxy, it will consume 1.6G memory...
if we deploy twemporxy and redis on the same machine. they will killed by OOMKiller.
原因:
$ ./bin/nutcracker -h
...
-m, --mbuf-size=N      : set size of mbuf chunk in bytes (default: 16384 bytes)
default mbuf size is 16K, and twemproxy will alloc at least one mbuf for one msg, so 100*1000 msgs will use 1.6G memory.
that is a big pipeline, got huge memory consumption
this:
data = '*3\r\n$3\r\nSET\r\n$13\r\nkkk-100001480\r\n$13\r\nvvv-100001480\r\n'
for i in range(1*1000):
    s.sendall(data)

#print s.recv(10*1000)
endswith:
==9226== 311,064 bytes in 997 blocks are possibly lost in loss record 38 of 38
==9226==    at 0x4C274A8: malloc (vg_replace_malloc.c:236)
==9226==    by 0x411C75: _nc_alloc (nc_util.c:224)
==9226==    by 0x409B6B: _msg_get (nc_message.c:200)
==9226==    by 0x409CC5: msg_get (nc_message.c:268)
==9226==    by 0x40A1DC: msg_recv (nc_message.c:439)
==9226==    by 0x406178: core_core (nc_core.c:158)
==9226==    by 0x41BBB7: event_wait (nc_epoll.c:269)
==9226==    by 0x405F88: core_loop (nc_core.c:316)
==9226==
==9226== LEAK SUMMARY:
==9226==    definitely lost: 0 bytes in 0 blocks
==9226==    indirectly lost: 0 bytes in 0 blocks
==9226==      possibly lost: 352,937 bytes in 1,129 blocks
==9226==    still reachable: 27,735 bytes in 50 blocks
==9226==         suppressed: 0 bytes in 0 blocks
==9226== Reachable blocks (those to which a pointer was found) are not shown.
==9226== To see them, rerun with: --leak-check=full --show-reachable=yes
this script:
data = '*3\r\n$3\r\nSET\r\n$13\r\nkkk-100001480\r\n$13\r\nvvv-100001480\r\n'
for i in range(1*1000):
    s.sendall(data)

#print s.recv(10*1000)
ends with:
==9255== 4,292,608 bytes in 262 blocks are possibly lost in loss record 40 of 40
==9255==    at 0x4C274A8: malloc (vg_replace_malloc.c:236)
==9255==    by 0x411C75: _nc_alloc (nc_util.c:224)
==9255==    by 0x40BCF5: mbuf_get (nc_mbuf.c:46)
==9255==    by 0x40BD4A: mbuf_split (nc_mbuf.c:241)
==9255==    by 0x40A1AA: msg_recv (nc_message.c:434)
==9255==    by 0x406178: core_core (nc_core.c:158)
==9255==    by 0x41BBB7: event_wait (nc_epoll.c:269)
==9255==    by 0x405F88: core_loop (nc_core.c:316)
==9255==
==9255== LEAK SUMMARY:
==9255==    definitely lost: 0 bytes in 0 blocks
==9255==    indirectly lost: 0 bytes in 0 blocks
==9255==      possibly lost: 4,376,723 bytes in 535 blocks
原因是太快的向proxy发送大量数据, proxy 不管三七二十一, 都把数据全部接收下来, 再慢慢处理, 这就造成大量msg对象堆在proxy的内存中,
nutcracker always try to receive at the client side:
rstatus_t
core_core(void *arg, uint32_t events)
{
    /* read takes precedence over write */
    if (events & EVENT_READ) {
        status = core_recv(ctx, conn);      //call conn->recv (msg_recv)
        if (status != NC_OK || conn->done || conn->err) {
            core_close(ctx, conn);
            return NC_ERROR;
        }
    }
    ...
}
if the client write to the socket, it will always success, (something like redis-cli --pipe ) then message queued at nutcracker, and got timeouted,
the problem is client do not know when to stop sending request,
I think we can add a config like max-queue, if nutcracker got too much request queued, it stop read at the client side.
so the client will block on sending
We are looking to use TwemProxy with Redis for sharding. We have use cases where we may need to fetch about 10k keys in one go from across multiple shards. However, when I try this with TwemProxy on a test setup (described below), it takes about 1.7 seconds to return. If I fired the same request on a single Redis instance directly, it returns in about 16ms.
-m 512, I got the best results. With this, multi-key get on 10k keys returned in about 750ms
For example, if my input buffer from read syscall contains 10 messages = [1, 2, 3, 4, 5, 6, ... 10], we leave existing message "1" in its current mbuf and copy messages from [2,3,4,5, ...10] to a new mbuf. Once message "1" is processed, we then we copy messages from [3,4,5,6,...10] to a new mbuf and so on and on. So, to split messages [1,2,3...10] across 10 mbufs we are doing quadratic instead of linear copies. This is really unfortunate,
否则一旦分配,就不释放
大量并发mget, 就需要用小的mbuf size
This is the reason why for 'large number' of connections or for wide multi-get like requests, you want to choose a small value for mbuf-size like 512
实际上, 已经做了这个优化, 只有第一次加事件的时候才真正加:
static void
req_forward(struct context *ctx, struct conn *c_conn, struct msg *msg)

    ...

    /* enqueue the message (request) into server inq */
    if (TAILQ_EMPTY(&s_conn->imsg_q)) {
        status = event_add_out(ctx->evb, s_conn);
        if (status != NC_OK) {
            req_forward_error(ctx, c_conn, msg);
            s_conn->err = errno;
            return;
        }
    }
    s_conn->enqueue_inq(ctx, s_conn, msg);
}
single 模式, 支持所有命令, 简单proxy.
pull-request:
issues 大家的呼声:
支持sentinel 自动主从切换.
其它人的一些改动:
yuyuyu101/twemproxy 很久以前做了kqueue 的port, 不过没有merge 到主干
jbfavre/twemproxy 主要做一些打包工作, 比如debian包.
shaofengniu/twemproxy 做了很多工作. 代码改动超过5000行.